12. 标记接口,注解和注解处理器的前世今生
简介
相信大部分的开发者都用过注解,尤其是对使用过Spring的开发者来说,注解是现代Spring中不可获取的一部分。Spring从最开始的xml配置到后面的注解配置,不论是从编程习惯还是项目的构建,都对我们程序员产生了非常重要的影响。
除了使用Spring自带的注解之外,我们还可以自定义注解。然后通过AOP来对注解进行拦截从而处理相应的业务逻辑。
除了Spring之外,其实JDK本身自带注解,本文将会深入探讨注解的起源和两种不同的使用方式。
更多内容请访问www.flydean.com
注解的起源和marker interfaces
先看一个最简单的注解:
@CustUserAnnotation
public class CustUser {
}
上面我们将CustUser标记为一个自定义的注解@CustUserAnnotation。
注解其实是在JDK 5中引入的。那么在JDK 5之前,注解是用什么方式来表示的呢?答案就是marker interfaces。
marker interfaces中文翻译叫做标记接口,标记接口就是说这个接口使用来做标记用的,内部并没有提供任何方法或者字段。
在java中有很多标记接口,最常见的就是Cloneable,Serializable,还有java.util包中的EventListener和RandomAccess。
以Cloneable为例:
/*
 * @since   1.0
 */
public interface Cloneable {
}
该接口从java1.0就开始有了。实现该接口的类才能够调用Object中的clone方法。
我们在代码中如何判断类是否实现了Cloneable接口呢?
public Object clone() throws CloneNotSupportedException {
        if (this instanceof Cloneable) {
            return super.clone();
        } else {
            throw new CloneNotSupportedException();
        }
    }
很简单,通过instanceof来判断是否是Cloneable即可。
marker interfaces好用是好用,但是有一些缺点,比如没有额外的元数据信息,功能太过单一,并且会和正常的interface混淆。实现起来也比一般的interface复杂。
正式由于这些原因,在JDK5中,引入了注解Annotation。
注解的定义
注解是由@interface来定义的。创建一个annotation需要指定其target和retention,并可以自定义参数。
我们举个例子:
@Retention(RetentionPolicy.RUNTIME)
@Target(ElementType.TYPE)
public @interface CustUserAnnotation {
    int value();
    String name();
    String[] addresses();
}
上面是我自定义的一个注解。
Retention
Retention表示注解将会在什么阶段可见。它有三个可选值:
SOURCE 表示只在源代码可见,编译的时候就会被丢弃。
CLASS 表示在class可见,也就是说编译的时候可见,但是运行时候不可见。
RUNTIME 表示运行时候可见。什么时候才需要运行时可见呢?那就是使用到反射的时候。我们会在后面的例子中具体的描述这种情况。
Retention本身也是一个注解:
@Documented
@Retention(RetentionPolicy.RUNTIME)
@Target(ElementType.ANNOTATION_TYPE)
public @interface Retention {
    /**
     * Returns the retention policy.
     * @return the retention policy
     */
    RetentionPolicy value();
}
Target
Target表示这个注解将会用到什么地方。它有12个值。
TYPE 表示用在Class,interface,enum或者record上。
FIELD 表示用在class的字段上。
METHOD 表示用在方法上。
PARAMETER 表示用在方法上面。
CONSTRUCTOR 用在构造函数上。
LOCAL_VARIABLE 用在本地变量上。
ANNOTATION_TYPE 用在注解上。
PACKAGE 用在package上。
TYPE_PARAMETER 用在类型参数上。
TYPE_USE 用在任何TYPE使用上。
TYPE_PARAMETER和TYPE_USE有什么区别呢?
TYPE_USE用在任何类型的使用上面,比如申明,泛型,转换:
@Encrypted String data
List<@NonNull String> strings
MyGraph = (@Immutable Graph) tmpGraph;
而TYPE_PARAMETER用在类型参数上:
class MyClass<T> {...}
MODULE 用在module上。
RECORD_COMPONENT 预览功能,和records相关。
Target和Retention一样�也是一个注解。
@Documented
@Retention(RetentionPolicy.RUNTIME)
@Target(ElementType.ANNOTATION_TYPE)
public @interface Target {
    /**
     * Returns an array of the kinds of elements an annotation type
     * can be applied to.
     * @return an array of the kinds of elements an annotation type
     * can be applied to
     */
    ElementType[] value();
}
自定义参数
注解也可以自定参数,参数可以是下的类型:
- 基础类型:int,long,double等
- String
- Class<T>
- 枚举类型
- 其他的注解类型
- 上面5中的数组
上面我们的自定义类型定义了三个参数:
    int value();
    String name();
    String[] addresses();
我们看下怎么使用:
@CustUserAnnotation(value = 100, name="jack ma",addresses = {"人民路","江西路"})
public class CustUser {
}
在使�用中,我们需要传入自定义的参数,当然你也可以使用default在注解中提供默认值,这样就不需要从外部传入。
在运行时使用注解
在运行时,我们可以使用反射的API来获得注解,并获取注解中的自定义变量,从而进行相应的业务逻辑处理。
CustUser custUser= new CustUser();
        Annotation[] annotations= custUser.getClass().getAnnotations();
        Stream.of(annotations).filter(annotation -> annotation instanceof CustUserAnnotation)
                .forEach(annotation -> log.info(((CustUserAnnotation) annotation).name()));
还是刚才的例子,我们通过getAnnotations方法获取到注解的值。
在运行时是用注解当然是个不错的主意,但是反射用的太多的话其实会影响程序的性能。
那么我们可以不可以将运行时的注解提前到编译时呢?答案是肯定的。
在编译时使用注解
要想在编译时使用注解,就要介绍今天我们的最后一部分内容annotation processors。
自定义processors需要实现javax.annotation.processing.Processor接口。
接下来我们自定义一个Processor:
@SupportedAnnotationTypes("com.flydean.*")
@SupportedSourceVersion(SourceVersion.RELEASE_14)
public class MyProcessor extends AbstractProcessor {
    @Override
    public boolean process(Set<? extends TypeElement> annotations, RoundEnvironment roundEnv) {
        System.out.println("process annotation!");
        annotations.forEach(annotation -> {
            Set<? extends Element> elements = roundEnv.getElementsAnnotatedWith(annotation);
            elements.stream()
                    .filter(TypeElement.class::isInstance)
                    .map(TypeElement.class::cast)
                    .map(TypeElement::getQualifiedName)
                    .map(name -> "Class " + name + " is annotated with " + annotation.getQualifiedName())
                    .forEach(System.out::println);
        });
        return true;
    }
}
SupportedAnnotationTypes表示支持的注解类型。
SupportedSourceVersion表示支持的源代码版本。
最后我们在process方法中,获取了注解类的一些信息。
有了processor我们怎么在maven环境中使用呢?
最简单的办法就是在maven的maven-compiler-plugin插件中添加annotationProcessors,如下所示:
    <build>
        <plugins>
            <plugin>
                <groupId>org.apache.maven.plugins</groupId>
                <artifactId>maven-compiler-plugin</artifactId>
                <version>3.8.1</version>
                <configuration>
                    <source>14</source>
                    <target>14</target>
                    <annotationProcessors>
                       <annotationProcessor>com.flydean.MyProcessor</annotationProcessor>
                    </annotationProcessors>
                </configuration>
            </plugin>
        </plugins>
    </build>
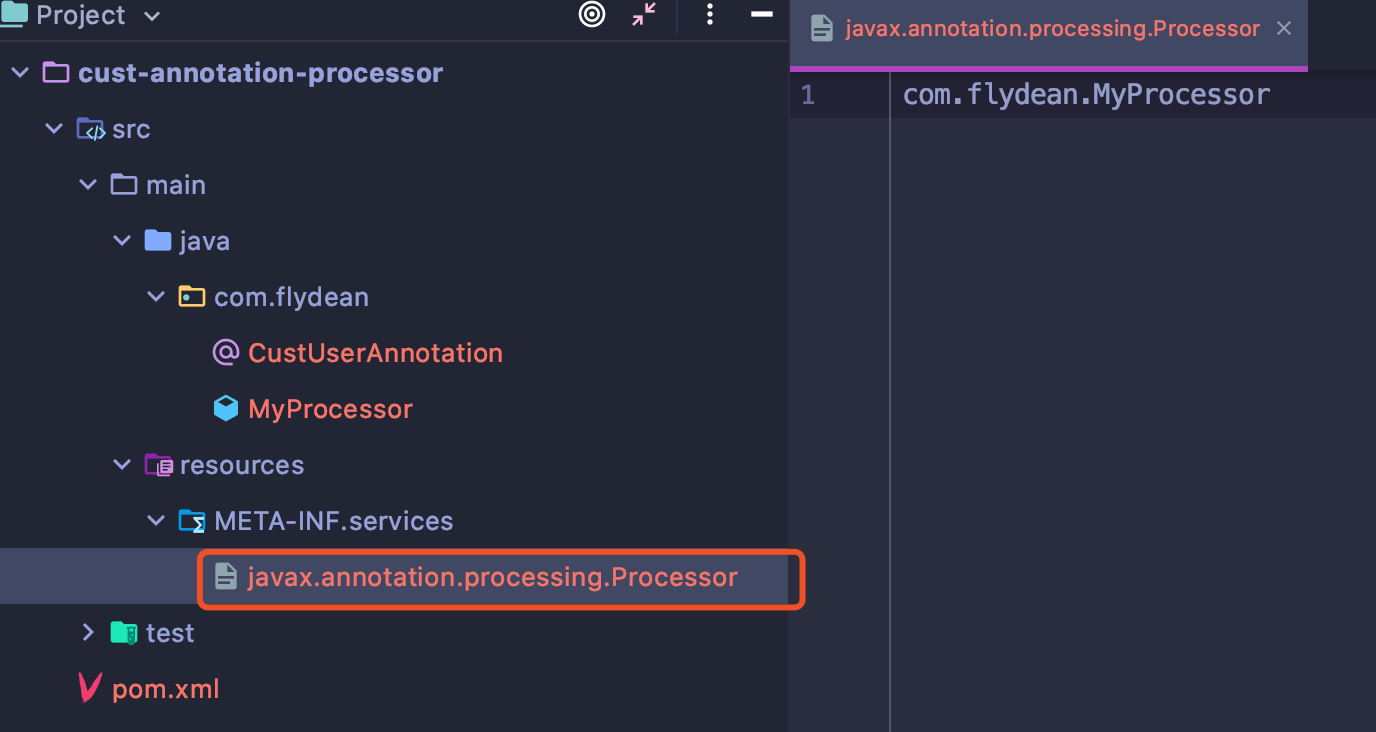
如果不添加,默认情况下编译器会从classpath中去寻找META-INF/services/javax.annotation.processing.Processor文件,这个文件里面列出了对外提供的注解处理器。编译器会加载这些注解处理器去处理当前项目的注解。
lombok应该大家都用过吧,它实际上为我们提供了两个注解处理器:

很不幸的是,因为我在CustUser中使用了lombok中的log,如果像上面一样显示指定annotationProcessor则会将覆盖默认的查找路径,最后会导致lombok失效。
那应该怎么处理才能兼容lombok和自定义的processor呢?
我们可以把自定义processor单独成一个模块,也做成lombok这样的形式:

这个processor的模块编译参数需要加上一个proc none的参数:
    <build>
        <plugins>
            <plugin>
                <groupId>org.apache.maven.plugins</groupId>
                <artifactId>maven-compiler-plugin</artifactId>
                <version>3.8.1</version>
                <configuration>
                    <source>14</source>
                    <target>14</target>
                    <proc>none</proc>
                </configuration>
            </plugin>
        </plugins>
    </build>
proc是设置是否需要在本项目中启用processor。对于processor项目来说,它本身还没有编译,如果启用就会出现找不到类的错误。所以这里我们需要将proc设置为none。
最后我们的annotation-usage项目可以不需要annotationProcessors的配置就可以自动从classpath中读取到自定义的processor了。
总结
本文介绍了marker interface,annotation和annotation processor,并详细讲解了如何在maven程序中使用他们。
本文的例子https://github.com/ddean2009/ learn-java-base-9-to-20
欢迎关注我的公众号:程序那些事,更多精彩等着您! 更多内容请访问 www.flydean.com
点我查看更多精彩内容:www.flydean.com

