1. flutter架构什么的,看完这篇文章就全懂了
简介
Flutter是google开发的一个跨平台的UI构建工具,flutter目前最新的版本是3.0.1。使用flutter你可以使用一套代码搭建android,IOS,web和desktop等不同平台的应用。做到一次编写到处运行的目的。
说到一次编写处处运行,大家可能会想到java。那么flutter跟java是不是类似呢?
对于JAVA来说,在编写完JAVA代码之后,将其编译成为class字节码,然后这个class字节码就可以不需要进行任何转换的在任何平台上运行。其底层原理是JAVA开发了适配不同操作系统和平台的JVM,class实际运行在JVM中,所以对底层到底运行在哪个平台是无感的。一切的适配都是由JVM来执行的。
Flutter其实更像是C或者C++,虽然代码是一样的,但是需要根据不同的平台编译成不同的二进制文件。而Flutter也是一样,虽然我们使用同一套dart代码编写了Flutter程序,但是需要不同的命令编译成不同平台的命令和安装包。
当然,在开发过程中,flutter提供了虚拟机,实现了hot reload的功能,在代码进行修改之后,可以立刻重载,而不需要重新编译整个代码。
FLutter这么神奇,那么它到底是怎么工作的呢?
Flutter的架构图
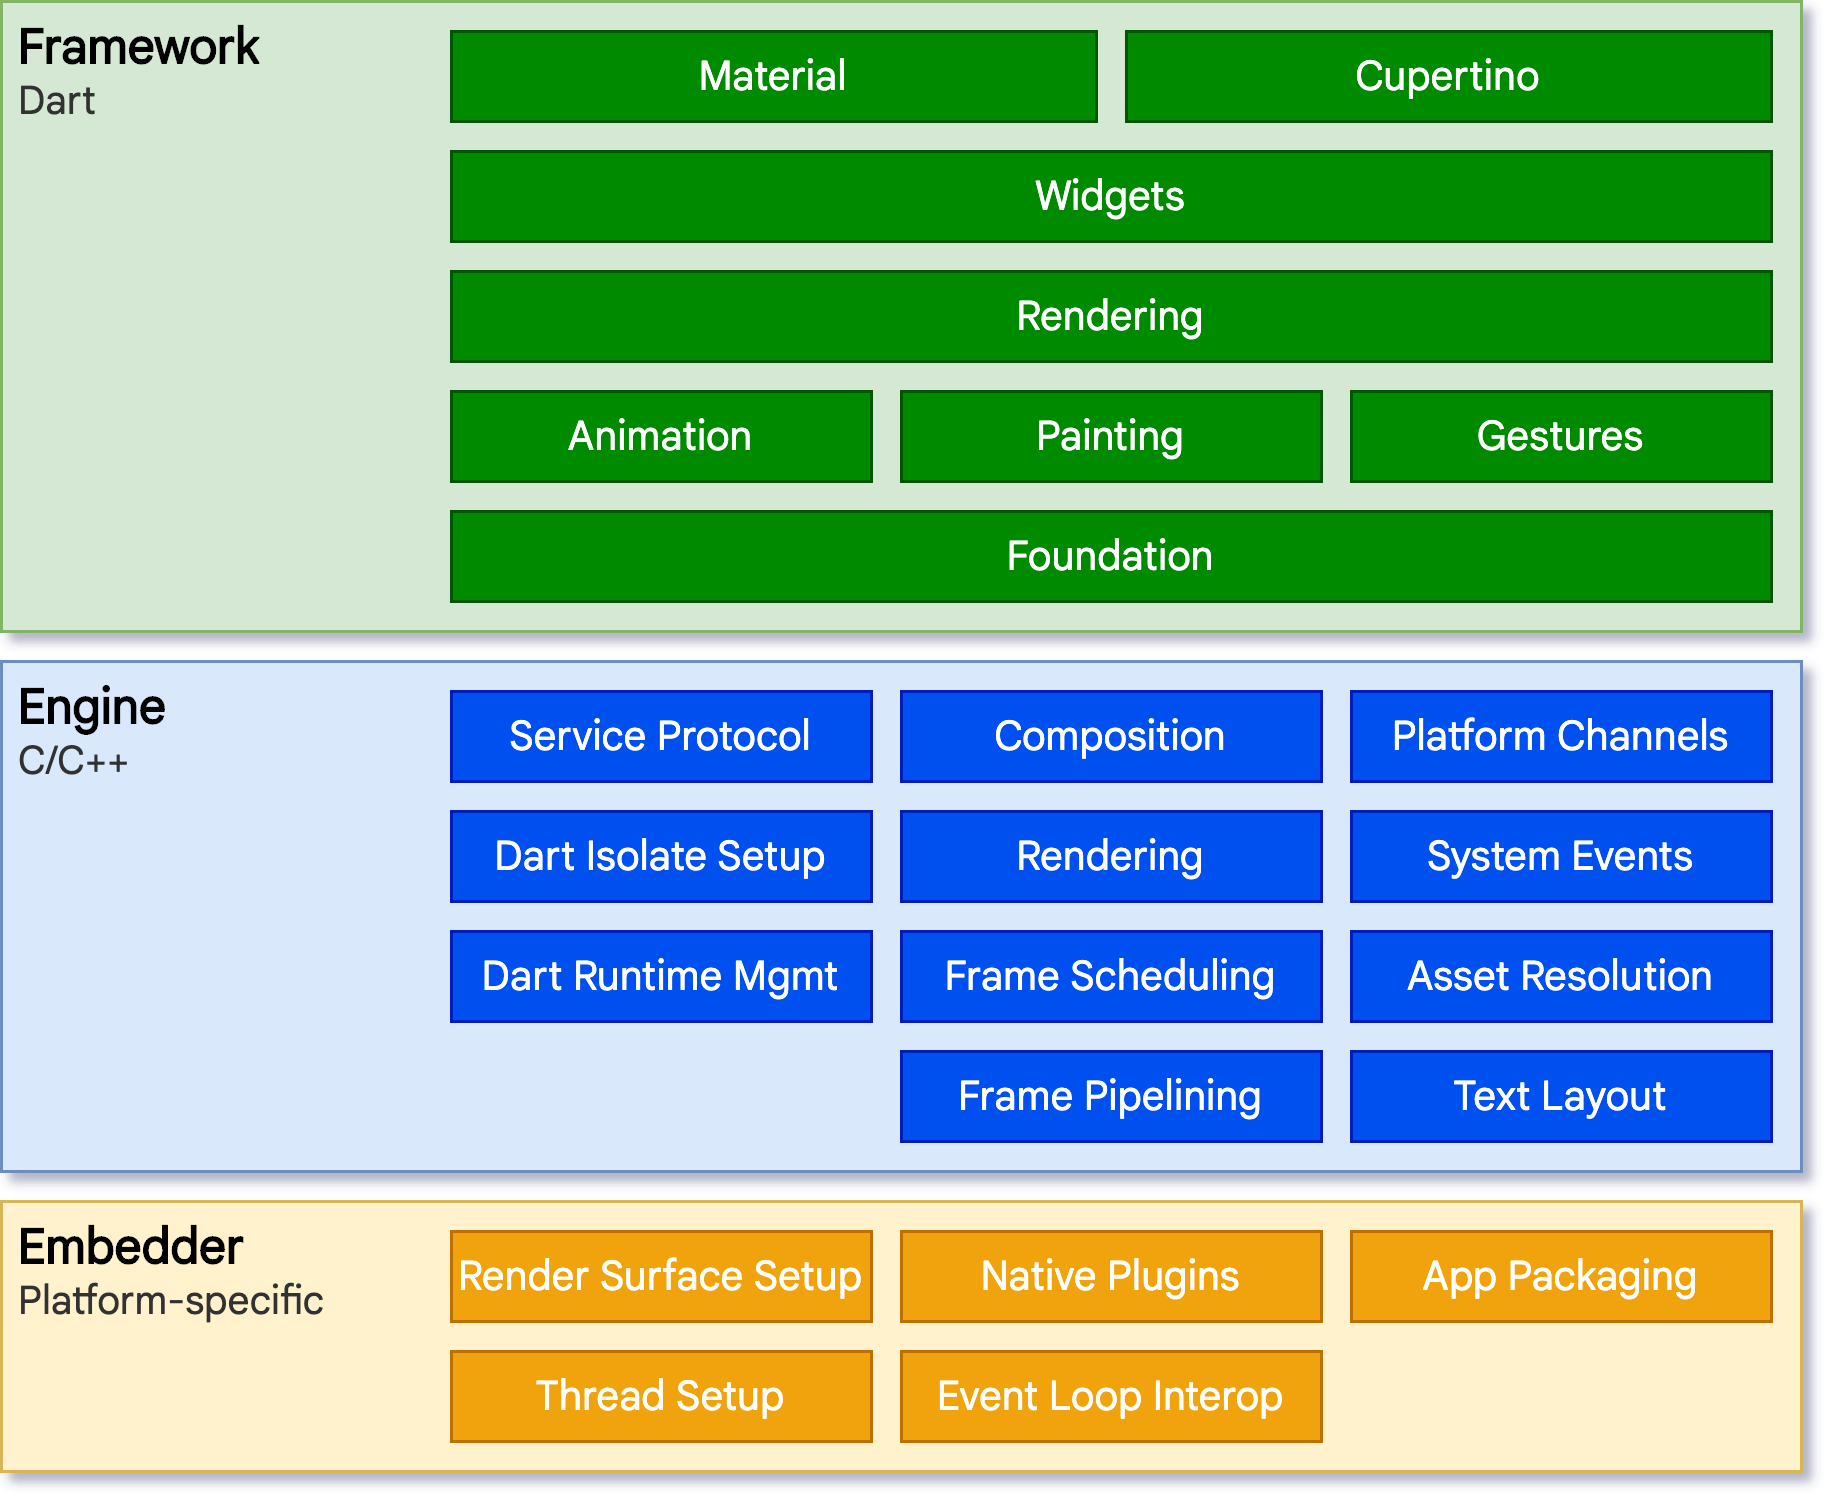
我们先来看下Flutter的架构图,当然这个架构图是官方来的,官方的架构图表示的是权威:

从上图中,我们可以看到Flutter的架构可以分为三部分,从下到上分别是embedder,Engine和Framework。
embedder
embedder可以称为嵌入器,这是和底层的操作系统进行交互的部分。因为flutter最终要将程序打包到对应的平台中,所以这个嵌入器需要和底层的平台接口进行交互。
具体而言,对于Android平台使用的是Java和C++,对于iOS和macOS平台,使用的是Objective-C/Objective-C++,对应Windows平台和Linux平台的是C++。
为什么C++这么强大? 这里就可以看出来了,基本上所有底层的东西都是用C++写的。
回到embedder,为什么叫做嵌入器呢?这是因为Flutter打包的程序,可以作为整个应用程序,也可以作为现有程序的一部分被嵌入使用。
engine
engine也叫做flutter engine,它是flutter中最核心的部分。
Flutter engine基本上使用C++写的。engine的存在是为了支持Dart Framework的运行。它提供了Flutter的核心API,包括作图、文件操作、网络IO、dar运行时环境等核心功能。
engine主要是通过dart:ui暴露给Flutter framework层的。
Flutter framework
这一层是用户编程的接口,我们的应用程序需要和Flutter framework进行交互,最终构建出一个应用程序。
Flutter framework主要是使用dart语言来编写的。
framework从下到上,我们有最基础的foundational包,和构建在其上的 animation, painting和 gestures 。
再上面就是rendering层,rendering为我们提供了动态构建可渲染对象树的方法,通过这些方法,我们可以对布局进行处理。
接着是widgets layer,它是rendering层中对象的组合,表示一个小挂件。
最后是Material和Cupertino库,这些库使用widegts层中提供的小部件,组合成了不同风格的控件集。
Flutter framework就是这样一层层的构建起来的。
当然,上面的embedder和engine属于比较底层的东西,我们只需要知道Flutter有这么一个东西,是这么使用的即可。
真正和我们程序员相关的,就是Flutter framework了。因为我们在编写代码的过程中,需要和Flutter framework打交道。
接下来,我们重点关注下Flutter framework中的几个核心部分。
Widgets
Widgets翻译成中文就是小插件的意思。Widgets是Flutter中用户界面的基础。你在flutter界面中能够观察到的用户界面,都是Widgets。
当然这些大的Widgets又是由一个个的小的Widgets组成的,而这些小的Widgets又是由更小的Widgets组成的。
这样就构成了Widgets的层次依赖结构,这些层次结构的关联关系是通过Widget中的child Widget进行关联的。
在这种层次结构中,子Widgets可以共享父Widgets的上下文环境。
Flutter中的Widgets跟其他语言中的类似的Widgets组合有什么不同呢?
他们最大的不同是,Flutter中的Widgets更多,每个Widgets专注的功能更小。即便是一个很小很小功能,在Flutter中都可以找到与之对应的Widgets。
这样做的好处就是,你可以使用不同的,非常基础的Widgets任意组合,从而构建出非常复杂的,个性化的大的Widgets。
当然,它的缺点也非常明显,就是代码里面的Widgets太多了,导致代码中的层级结构特别的多,可能会看的眼花缭乱。
举个简单的例子,Container是flutter提供的一个基本的容器Widget,我们通常这样来使用它:
 Container(
   constraints: BoxConstraints.expand(
     height: Theme.of(context).textTheme.headline4!.fontSize! * 1.1 + 200.0,
   ),
   padding: const EdgeInsets.all(8.0),
   color: Colors.blue[600],
   alignment: Alignment.center,
   child: Text('Hello World',
     style: Theme.of(context)
         .textTheme
         .headline4!
         .copyWith(color: Colors.white)),
   transform: Matrix4.rotationZ(0.1),
 )
我们向Container中传入了constraints,padding,color,alignment,child,transform等信息。
我们先来猜一下,这些信息中,哪些是用来构建Widget的?
大家第一时间想到的应该是child,它本身就是一个Widget,用来表示Container中包含的子对象,这个很好理解。
但是,除了child这个Widget之外,其他的constraints,padding,color,alignment,transform等都是构成Widget的元素!
我们来看下Container的build方法:
 Widget build(BuildContext context) {
    Widget? current = child;

    if (child == null && (constraints == null || !constraints!.isTight)) {
      current = LimitedBox(
        maxWidth: 0.0,
        maxHeight: 0.0,
        child: ConstrainedBox(constraints: const BoxConstraints.expand()),
      );
    }

    if (alignment != null)
      current = Align(alignment: alignment!, child: current);

    final EdgeInsetsGeometry? effectivePadding = _paddingIncludingDecoration;
    if (effectivePadding != null)
      current = Padding(padding: effectivePadding, child: current);

    if (color != null)
      current = ColoredBox(color: color!, child: current);

    if (clipBehavior != Clip.none) {
      assert(decoration != null);
      current = ClipPath(
        clipper: _DecorationClipper(
          textDirection: Directionality.maybeOf(context),
          decoration: decoration!,
        ),
        clipBehavior: clipBehavior,
        child: current,
      );
    }

    if (decoration != null)
      current = DecoratedBox(decoration: decoration!, child: current);

    if (foregroundDecoration != null) {
      current = DecoratedBox(
        decoration: foregroundDecoration!,
        position: DecorationPosition.foreground,
        child: current,
      );
    }

    if (constraints != null)
      current = ConstrainedBox(constraints: constraints!, child: current);

    if (margin != null)
      current = Padding(padding: margin!, child: current);

    if (transform != null)
      current = Transform(transform: transform!, alignment: transformAlignment, child: current);

    return current!;
  }
从代码中可以看到,Container先是创建了LimitedBox,然后将其嵌入到Align中,再依次嵌入到Padding,ColoredBox,ClipPath,DecoratedBox,ConstrainedBox,Padding和Transform中。这些所有的对象都是Widget。
这里应该可以理解Flutter中Widget的设计思想了。在Flutter中一切皆可为Widget。
Widgets的可扩展性
和其他的编译成原生语言特性的跨平台实现如React native相比,Flutter对于每个UI都有自己的实现,而不是依赖于操作系统提供的接口。
这样做的好处就是一切都是由Flutter自己控制的,使用者可以在Flutter的基础上进行无限扩展,而不用受限于系统底层的实现限制。
另一方面,这样可以减少Flutter在呈现过程中在Flutter代码和平台代码之间来回转换,减少了性能瓶颈,提升效率。
最后,因为UI的实现和底层的操作系统是分离的,所以Flutter的APP在不同的平台上面可以有统一的外观和实现,可以保证风格的统一。
Widgets的状态管理
Widgets表示的是不可变的用户UI界面结构。虽然结构是不能够变化的,但是Widgets里面的状态是可以动态变化的。
根据Widgets中是否包含状态,Widgets可以分为stateful和stateless widget,对应的类是StatefulWidget和StatelessWidget。
对于有些Widgets来说,比如icon或者Label,它里面本身就不需要状态,这些Widgets就是StatelessWidget。
但是如果有些Widgets中的某些内容可能需要根据用户或者其他原因来动态变化,则就需要使用StatefulWidget。
之前提到了Widgets是不可变的,StatefulWidget中的可变数据是存放在对应的State中的,所以StatefulWidgets本身并没有build方法,所有用户界面都是通过State对象来构建的。
当State发生变化的时候,需要调用setState() 方法来通知flutter框架来调用State的build方法,从而将变化反馈到用户界面中。
既然StatefulWidget是带有状态的,那么这些状态是��怎么进行管理和传递的呢?
State本身提供了一个build方法,用于构建初始的状态:
Widget build(BuildContext context);
如果在一个StatefulWidget中需要嵌入另外一个StatefulWidget,那么可以在其对应的State中调用另外一个StatefulWidget的构造函数,将要传递的数据,以构造函数参数的形式传递给子Widget。
当然这样做是没问题的。但是如果组件的嵌套层数过多的话,这种构造函数的传递方式,显然不能满足我们的需求。
于是Flutter提供了一个InheritedWidget类,如果我们自定义的类需要共享数据给子Widgets,则可以继承InheritedWidget。
Inherited widgets有两个作用: 第一,子Widget可以通过Inherited widgets提供的静态of方法拿到离他最近的父Inherited widgets实例。
第二,当Inherited widgets改变state之后,会自动触发state消费者的rebuild行为。
先来看一下inherited widgets类的定义:
abstract class InheritedWidget extends ProxyWidget {

  const InheritedWidget({ Key? key, required Widget child })
    : super(key: key, child: child);

  @override
  InheritedElement createElement() => InheritedElement(this);

  @protected
  bool updateShouldNotify(covariant InheritedWidget oldWidget);
}
可以看到InheritedWidget是对实际Widget对象的代理,另外还将InheritedWidget封装到了InheritedElement中。
这里不多讲解InheritedElement,InheritedElement是底层通知机制的实现。
我们看到InheritedWidget还添加了一个updateShouldNotify,这个方法可以提供给我们控制当前InheritedWidget rebuilt的时候,是否需要rebuilt继承它的子Widget。
下面我们看一个InheritedWidget的具体实现:
class FrogColor extends InheritedWidget {
  const FrogColor({
    Key? key,
    required this.color,
    required Widget child,
  }) : super(key: key, child: child);

  final Color color;

  static FrogColor of(BuildContext context) {
    final FrogColor? result = context.dependOnInheritedWidgetOfExactType<FrogColor>();
    assert(result != null, 'No FrogColor found in context');
    return result!;
  }

  @override
  bool updateShouldNotify(FrogColor old) => color != old.color;
}
FrogColor中定义了一个Color属性,当Color发生变化的时候,就会调用updateShouldNotify。
另外,FrogColor还提供了一个of方法,接受的参数是BuildContext,然后调用context.dependOnInheritedWidgetOfExactType去查找离该context最近的FrogColor。
为什么要使用of方法对context.dependOnInheritedWidgetOfExactType进行封装呢?这是因为,context.dependOnInheritedWidgetOfExactType方法不一定能够找到要找的对象,所以我们需要进行一些异常值的处理。
另外,有可能of方法返回的对象和context.dependOnInheritedWidgetOfExactType中查找的对象不一样,这都是可以的。
我们看下of方法的具体使用:
class MyPage extends StatelessWidget {
  const MyPage({Key? key}) : super(key: key);

  @override
  Widget build(BuildContext context) {
    return Scaffold(
      body: FrogColor(
        color: Colors.green,
        child: Builder(
          builder: (BuildContext innerContext) {
            return Text(
              'Hello Frog',
              style: TextStyle(color: FrogColor.of(innerContext).color),
            );
          },
        ),
      ),
    );
  }
}
还有一个问题,of方法传入的是BuildContext对象,注意,这里的BuildContext必须是InheritedWidget对象本身的后辈,也就是说在对象树中,必须是InheritedWidget的子树。再看下面的例子:
class MyOtherPage extends StatelessWidget {
  const MyOtherPage({Key? key}) : super(key: key);

  @override
  Widget build(BuildContext context) {
    return Scaffold(
      body: FrogColor(
        color: Colors.green,
        child: Text(
          'Hello Frog',
          style: TextStyle(color: FrogColor.of(context).color),
        ),
      ),
    );
  }
}
这个例子中,FrogColor.of方法中的context是FrogColor的父context,所以是找不到FrogColor对象的,这样的使用是错误的。
当然,除了InheritedWidget,Flutter还提供了很多��状态管理的工具,比如provider,bloc,flutter_hooks等,也是非常好用的。
渲染和布局
渲染就是将上面我们提到的widgets转换成用户肉眼可以感知的像素的过程。
Flutter作为一种跨平台的框架,它和普通的跨平台的框架或者原生的框架有什么区别呢?
首先来考虑一下原生框架。以android为例,首先调用的是andorid框架的java代码,通过调用android系统库提供的进行绘制的组件,最后调用底层的Skia来进行绘制。Skia 是一种用 C/C++ 编写的图形引擎,它调用 CPU 或 GPU 在设备上完成绘制。
那么常见的跨平台框架是怎么运行的呢?它们实际上在原生的代码框架上面又封装了一层。通常使用javascript这样的解释性语言来进行编写,然后编写的代码再和andorid的JAVA或者IOS的Objective-C系统库进行交互。这样的结果就是在UI交互或者调用之间会造成显著的性能开销。这也就是通用的跨平台语言不如原生的性能好的原因。
但是flutter不一样,它并不是用系统自带的UI控件,而是拥有自己的实现。Flutter代码会直接被编译成使用 Skia 进行渲染的原生代码,从而提升渲染效率。
接下来,我们具体看一下flutter从代码到渲染的整个流程。首先看一段代码:
Container(
  color: Colors.blue,
  child: Row(
    children: [
      Image.network('http://www.flydean.com/1.png'),
      const Text('A'),
    ],
  ),
);
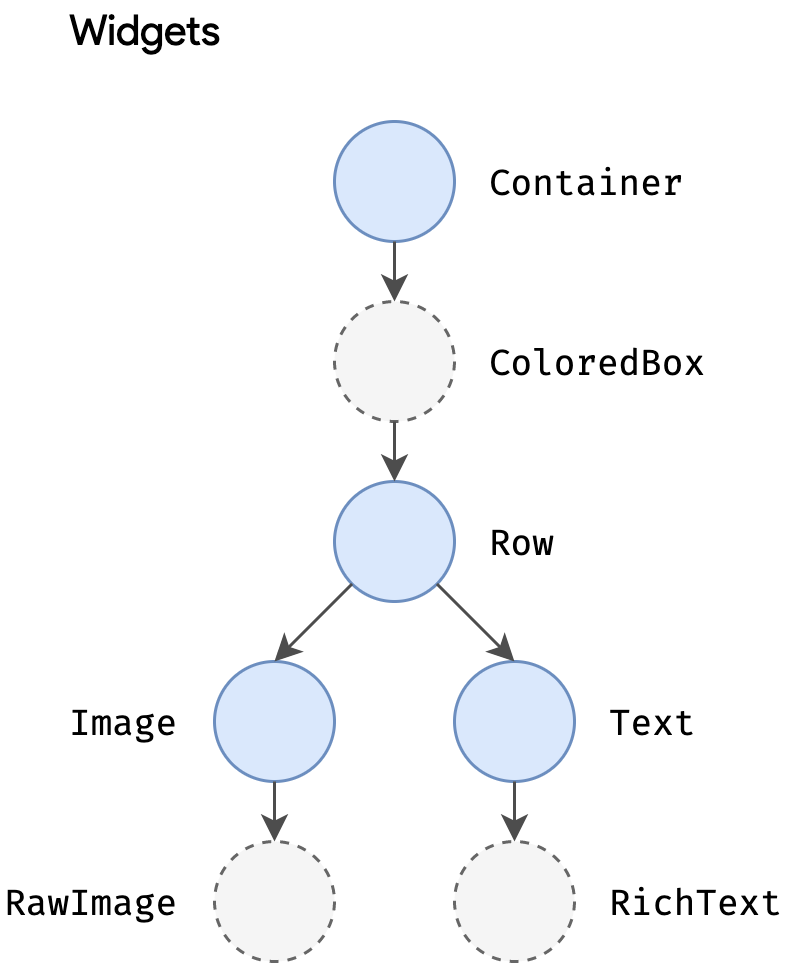
上面的代码是构建一个Container widget。当flutter想要渲染这个widget的时候,会去调用build() 方法,然后生成一个widget集合.
为什么是Widget集合呢?在上面我们也分析过,Container这个widget是由很多个其他的widget组成的,所以,上面的Container会生成下面的widget树:

上面的就是代码中生成的widget,这些widget在build的过程中,会被转换为 element tree。一个element和一个widget对应。
element表示的widget的实例。flutter中有两种类型的element,分别是:ComponentElement和RenderObjectElement.
ComponentElement是其他Element的容器,而RenderObjectElement是真正参与layout和渲染的element。
因为Widget本身是不可变的,所以任何对于Widget的修改都会返回一个新的Widget。那么是不是所有的变动,都会导致整个element tree重新渲染呢?
答案是不会的,flutter仅会重新渲染需要被重新绘制的element。
接下来,我们看下渲染树是怎么构建的,渲染树中的每个元素叫做RenderObject,它定义了布局和绘制的抽象模型。
上面我们提到的RenderObjectElement会在渲染的时候转换成为RenderObject,如下所示:

当然,不同的Render element会转换成为不同的Render对象。
总结
Widget和Layout是我们实际在做flutter开发的时候,经常需要使用到的部分,大家需要深入了解和熟练掌握。
点我查看更多精彩内容:www.flydean.com

